How to Reverse Tie Dye: Your Ultimate Guide

Whether you have been spending way too much time cooped up at home because of COVID-19 and need a new hobby to pass the time, are searching for a fun weekend project to do with your kids or are trying to come up with a new product to sell in-store or online, there are plenty of options to choose from. Garment customization is one of the best, though. Learning various techniques for customizing garments allows you to make one-of-a-kind creations that are perfect to wear, give as gifts or even sell. It’s a lot of fun, too!
If you are looking for a fun and vibrant way to customize blank apparel, reverse tie dye could be the way to go. Making tie dye shirts is one of those craft projects that is appropriate for all ages and never goes out of style. If you have gotten tired of making the usual designs on white or light-colored shirts, though, learning how to reverse tie dye could be a great way to get your creative juices flowing and re-ignite your passion for this classic craft.
The best part?
Doing reverse tie dye is just as easy as making a regular tie dye shirt. It just allows you to add bright colors to black shirts instead of only working on lighter garments. And like other types of tie dye, this technique can be used to customize bulk wholesale t-shirts, decorate wholesale trucker hats and more. Ready to get started? Let’s go!
What Is Reverse Tie Dye?
Before we get into the specifics, you need to understand what reverse tie dye is. Also known as bleach tie dye, it is the process of removing dye from sections of a dark-colored garment using bleach and then dyeing the bleached areas vibrant colors.
Tie dye is always in style to some degree, but it is having an especially big moment right now. By learning the art of reverse tie dye, you can create one-of-a-kind apparel that fits the style but is not the same as what everyone else is wearing.
If you already know how to tie dye, learning reverse tie dye is a breeze. The dyeing process remains mostly the same. The primary difference is the added step of bleaching the garment first. This step creates light spots where you can add your chosen dye colors.
Here is the entire process:
Gather Your Supplies
To save yourself time and hassle, make sure you have everything you need before getting started. For this project, you will need:
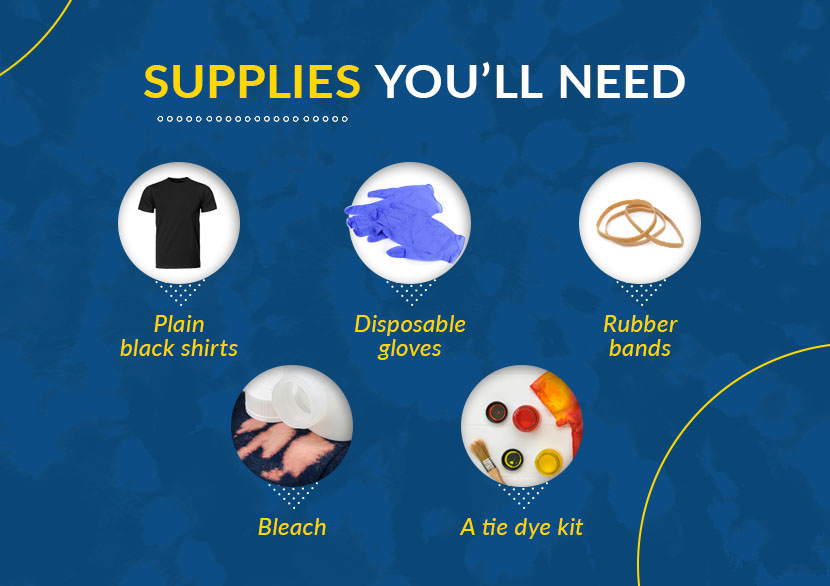
- Plain black shirts (T-shirts and plain sweatshirts work great for beginners)
- A tie dye kit
- Rubber bands
- Bleach
- Disposable gloves (At least two pairs per person working on the project)
Shirts made from 100 percent cotton yield the best results. Cotton absorbs dye better than other fibers, so it is your best bet when you want to create a vibrant look. You can use regular household bleach in a squirt or spray bottle or bleach toilet bowl cleaner for your bleach. We recommend using toilet bowl cleaner for this project because it is usually thicker and easier to control than liquid bleach.
If you do use liquid bleach, do not use it straight out of the bottle. Instead, mix up a solution of 50 percent water and 50 percent bleach. Diluting the bleach makes it much less likely to damage the fabric.
Rubber bands can be replaced by string, too. Keep in mind, though, that using string may change the finished appearance of your shirt. Rubber bands and non-absorbent string result in more defined lines than string made from absorbent materials. It primarily comes down to preference. Some people prefer working with rubber bands, while others prefer string. Feel free to experiment to determine which option you like best.
Since this project can be pretty messy – especially when working with kids – you may want to grab some supplies for protecting your table, countertop or floor, too. Alternatively, this is a great project to do outside on a nice day.
Prepare Your Shirt
When you are making a regular tie dye shirt, it helps if the t-shirt is damp. With reverse tie dye, though, dry is better.
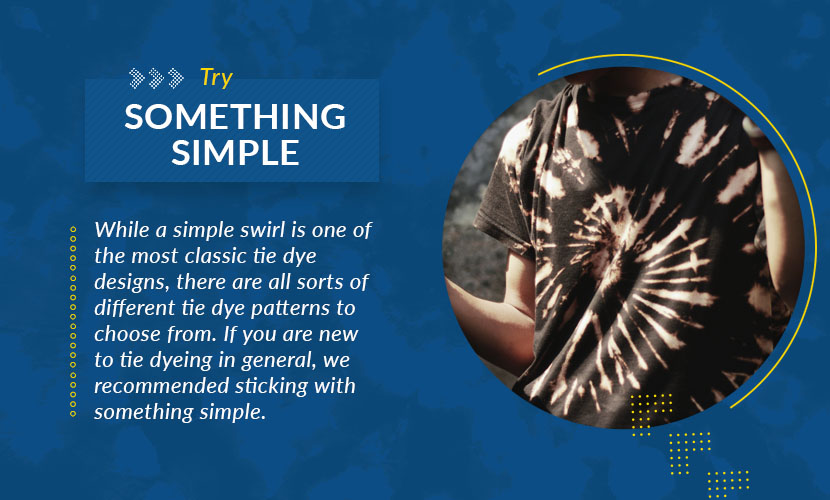
Decide what type of pattern you would like to create and fold, crinkle or swirl the fabric to create the desired pattern. While a simple swirl is one of the most classic tie dye designs, there are all sorts of different tie dye patterns to choose from. If you are new to tie dyeing in general, we recommended sticking with something simple. If you have some experience under your belt, though, feel free to try a more complex design.
Once you’ve folded the shirt into the appropriate shape, secure it with rubber bands. To keep things interesting, consider using several different sizes of rubber bands. Doing so slightly modifies the finished design and allows you to make your tie dye shirts even more unique.
Apply Bleach
This step is where things start to get messy! If you have not already changed into old clothes and put on some gloves, now is the time to do so.
Move your shirt outside or to a well-ventilated area (because fumes are strong!). Be mindful that bleach is damaging to many surfaces, too. Choose a surface that is bleach-friendly, or cover the area completely to prevent damage.
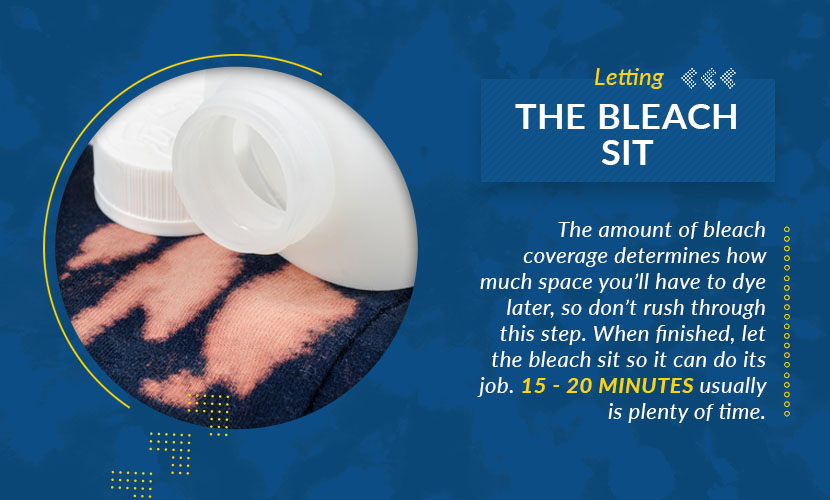
Carefully open the bleach and pour it on the prepared shirt. You might need to use your gloved hands to spread the bleach around to cover the entire shirt. The amount of bleach coverage you have determines how much space you’ll have to dye later, so don’t rush through this step.
When you are finished, let the bleach sit so it can do its job. Fifteen to 20 minutes usually is plenty of time. Don’t leave the bleach on the shirt for more than an hour as it could damage the fabric. Once it has an orangish appearance, you’re good to go!
Rinse
Once the shirt is bleached, remove the rubber bands and rinse thoroughly. We recommend that you do this by hand rather than using your washing machine, especially if using bleach toilet cleaner. The gel may not rinse away entirely in a wash cycle, and any that remains could damage your design. Rinsing in the bathtub or a large sink is the easiest and most effective method.
At this point, you technically could call your project finished. If you want to add color to your design, though, keep reading.
Add Color
After rinsing, wring the shirt out and let it dry slightly. It should be slightly damp but not soaking wet. If the shirt is too wet, the tie dye will spread much too quickly, and you may not be able to achieve your desired result.
Mix up the dye according to the package instructions. In most cases, you just need to add a specified amount of water and shake.
Lay the shirt out flat (on a protected surface or one you don’t care about staining), and carefully apply dye to the bleached areas. Work slowly since the dye will spread, but be sure to use enough dye to ensure good saturation.
Take care to apply colors that blend well next to each other. If you use blue and red next to each other, they will form purple where they overlap. If you apply red and green next to each other, though, you will end up with an unpleasant brown. Now is a great time to brush up on primary, secondary and tertiary colors!
Once you have completely covered the front of the shirt, flip it over. Most of the bleached area on the backside should already be filled in. If there are blank spots, though, use your dye to fill them in.
Let the Dye Set
When you are finished applying the dye to both sides of the shirt, carefully place it in a plastic bag. A regular bag from the grocery store works fine, or you can use a trash bag. If you are dyeing multiple shirts at once, place each in its own bag.
Set the bag aside (in a warm area, if possible) for a minimum of six hours. Check the instructions on your tie dye kit, though, as there may be some variation. In general, the longer you let the dye set, the more vibrant the results will be. When you want to make a shirt that is the brightest of bright, consider letting it sit overnight (or longer).
Rinse Out the Dye
Once the dye has had plenty of time to set, it is time to rinse. Carefully rinse your shirt using cold water. Again, it is essential to do this in an area that the dye will not damage. You may want to consider bleaching your bathtub or sink immediately after rinsing to prevent stains.
Rinse until the water runs clear and then rinse a bit more just to be safe. Then, throw the shirt (or shirts) in your washing machine and launder as usual. Use cool water and a mild detergent to prevent fading.
Learn How to Wash Tie Dye Shirts
After washing and drying your new shirt, it is ready for wear! Take some time to admire your handiwork and then get ready to take it to the next level!

Using Reverse Tie Dye to Customize Other Garments and Accessories
While blank t-shirts and sweatshirts are the most popular options for tie-dyed creations, they are certainly not the only things you can customize using the reverse tie dye technique. This method works on nearly anything that is black and made of natural fibers.
Once you have mastered the art of reverse tie dyeing shirts, try your hand at customizing other black garments, like sweatpants, tank tops or even underwear. Just make sure that, for the best results, you choose apparel that is made entirely or mainly from cotton.
Synthetic fabrics and those made from blends of natural and synthetic fibers can be dyed, but the results usually are not as vibrant. You may need to use a special dye or color enhancer to achieve rich results on polyester and other human-made materials. Learn more about the best and worst fabrics for tie dye on our blog.
You can also reverse tie dye things like hats and socks or even household textiles like tapestries, sheets, duvet covers, curtains and towels. This process is highly versatile, and it is a lot of fun seeing how it works on different substrates. Feel free to experiment and create products to wear, display, give as gifts or sell.
Final Thoughts
Whether you are thinking about starting a business, making new clothes for your wardrobe or searching for a fun project to do with your kids, making reverse tie dye shirts is a great option. This project is easy to learn, and because no two pieces ever turn out exactly alike, the possibilities are endless.
At The Adair Group, we have black t-shirts, sweatshirts, hoodies and more that are perfect for reverse tie dye. And whether you are looking to buy several hundred garments or just a few, we have options to meet your needs (as well as your budget). Browse our full selection today to find the blank apparel you need for your next project!
Image Credits
Svetlana Cherkasova/shutterstock.com
be-bright/shutterstock.com
Dzha33/shutterstock.com
ND700/shutterstock.com
Quang Ho/shutterstock.com
VLADIMIR VK/shutterstock.com
PHOTO FUN/shutterstock.com
Artist Photographer 3D/shutterstock.com
Muhammad Rendra/shutterstock.com
jazzmxx/shutterstock.com

Popular Posts
- Birthday T-Shirts Are Easy and Fun!
What better day to talk about birthday t-shirts than on your birthday?! Today is MY birthday and I love thinking...
- The 5 Most Popular T-Shirt Colors Are....
Being in the t-shirt, business we get asked this question all the time. What are the most popular t-shirt colors? No...
- What is a Lift Gate Delivery Service?
When you order bulk t-shirts online, your shipping charges are calculated using the weight of your shipment and your d...
Categories
- All Things Adair
- Branded Apparel
- Buying Guide
- Celebrate Holidays With T's
- Clothing Maintenance
- Colors
- Creative T-Shirt Ideas
- DIY
- Fabrics
- Fruit of the Loom
- Hats
- Helping the Community
- History of T-Shirts
- Learn About Our Products
- Matching T-shirts
- Polos
- Scrubs
- Style
- Sweatshirts
- T-Shirts in Sporting Events
- Team T-shirts
- The 411 on the T-Shirt Business
- Tie Dye
- Uncategorized
- Underwear
- Wholesale Apparel