How to Tie Dye a Hoodie: Your Guide to Tie Dyeing for Sweater Weather
 It’s that time of year again! With the days getting shorter and the leaves (and temperatures) falling, your thoughts have probably turned to filling your closet with cozy clothes that will keep you toasty on chilly fall and winter days. You might also be trying to come up with some unique ideas for holiday gifts or searching for the perfect garment to add to your store’s fall and winter collection.
Whatever the case may be, you can never go wrong with a hooded sweatshirt. And since tie dye has been enjoying a huge moment in the fashion works, wholesale hoodies is an excellent way to fill your closet, stock your store, or create one-of-a-kind gifts for the holiday season.
Find Wholesale Hoodies Perfect for Sweater Weather at The Adair Group!
Like making tie dyed t-shirts, dyeing hoodies is a fun and simple project that is perfect for people of all ages. Whether you prefer crafting solo or with family or friends, working on this project is a fantastic way to brighten up a dreary day. Keep reading to learn how to tie dye a hoodie.
What You’ll Need

Supply List:
- Blank hooded sweatshirt
- Tie dye kit
- Disposable gloves
- Trash bags
- Rubber bands
- Baking rack (Not required, but extremely helpful!)
The first thing you’ll need for making a tie dyed hoodie is, of course, a hooded sweatshirt. White works best when you want the colors to pop. Pastels work, too, though. Just be mindful of how the dye colors will mix with the color of the shirt. For example, if you add red dye to a pastel blue hoodie, the dyed area will have a purplish hue. For a unique look, consider customizing a black hoodie using the reverse tie dye technique.
We recommend stocking up on bulk sweatshirts at wholesale prices. Buying in bulk allows you to get several hoodies for roughly the same amount you’d pay to buy one from many retailers. In addition to making sound financial sense, going with this option means you will have extras in case your first attempt does not turn out quite as you had hoped. And when you shop The Adair Group for wholesale hooded sweatshirts for making tie dye shirts, you will score amazing deals on products from trusted brands like Gildan.
Hooded sweatshirts made from 100% cotton yield the brightest and most vibrant results. Shirts made from blends of cotton and polyester work, but the colors typically do not turn out as bright. Before shopping, check out our guide to the best and worst fabrics for tie dye to learn more about what materials work best.
When shopping for tie dye kits, products made by Tulip are a great option. Tulip dyes are easy to use, and the kits usually come with everything you need to tie dye bulk t shirts and sweatshirts — including gloves and rubber bands. You can find this brand at most craft stores and big-box retailers, too.
While not essential, a baking rack makes it much easier to prevent the colors from bleeding while dyeing your shirt. Place one in your kitchen sink to put your shirt on while dyeing, and you won’t have to worry about the garment sitting in a puddle of mixed dye. If you don’t want to dye shirts in your sink, you can also place a baking rack inside a dishpan or on top of a protected work surface.
Preparing Your Hoodie
You are probably excited to start adding dye to your hoodie, but it’s essential to do a little bit of prep work before you do. Preparing your hoodie is crucial when it comes to ensuring the best possible results, so you don’t want to skip these steps.
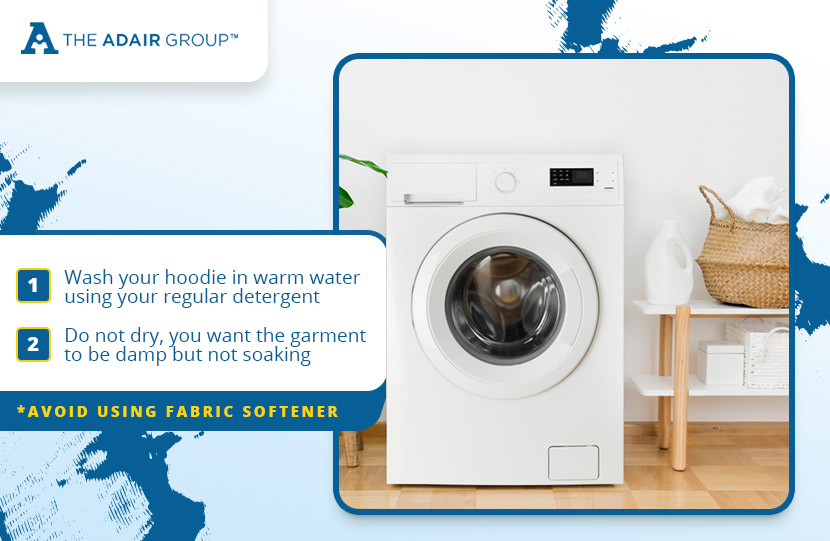
First, wash your hoodie (or hoodies) in warm water using your regular detergent. This removes any softeners, chemicals, or other contaminants that could be on the garment. Avoid using fabric softener. The residue it leaves behind could get in the way when tie dyeing.
After laundering the garment, remove it from your washing machine, but do not dry it. Fabric dye penetrates damp fibers better, resulting in a more vibrant finished appearance. For best results, you want the garment to be damp but not soaking wet.
Folding for the Desired Effect
Place the clean sweatshirt on a protected work surface, and smooth out any wrinkles using your hands. Decide what type of tie dye pattern you would like to create, then fold, twist, and bunch the fabric accordingly. Secure using rubber bands.
Not sure what pattern to try? You can never go wrong with the classic spiral.
To tie dye a top in a spiral pattern, pinch the fabric in the center of the garment. Then, twist until the entire shirt is wrapped around the pinched area. Take your time while doing this, and use your other hand to adjust the folds as needed. Ideally, the folds that form in the shirt while twisting should all be roughly the same size. Once the shirt is twisted and folded, secure with rubber bands. The shirt should be relatively flat and divided into wedges like a pizza using rubber bands when you are finished. At this point, you’re ready to move on to the next step.
If you want to try something a bit less traditional, there are tons of different tie dye techniques and color combos. And if you are feeling super creative, you can always experiment with your own designs and techniques to create unique tie dyed apparel.
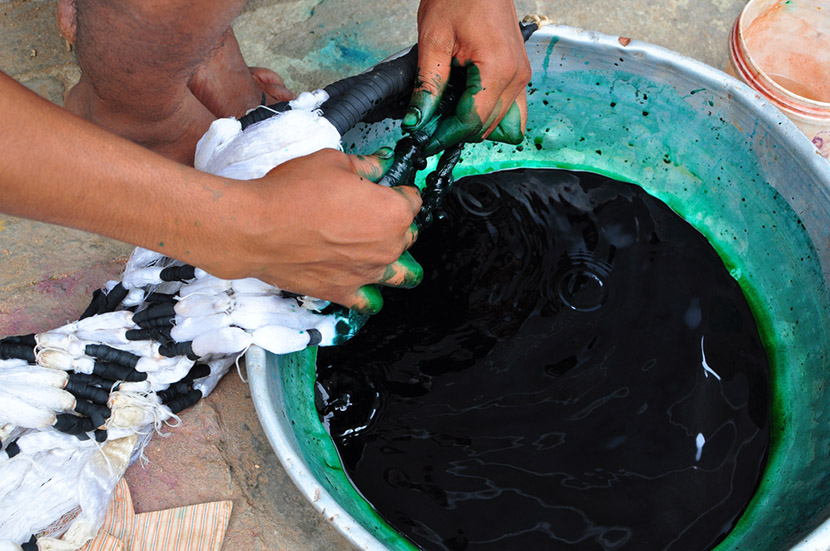
Applying the Dye
This is where the fun begins!
Before you bust out those bottles of dye, though, you need to figure out an area where you can work without worrying about causing damage with the dye. If you are working at a table, cover the surface with trash bags and a layer of paper towels. Alternatively, you can use tubs or place your shirt in your kitchen sink while applying color.
Once you have decided where to work and, if necessary, protected the surface, grab your baking rack. Place it in your sink, tub, or on your work surface, and place your shirt on top. Doing this allows the excess dye to drip through the shirt rather than collecting in the fabric and potentially causing an unpleasant, muddy look.
Put on your gloves, then mix up the dye according to the instructions included with your kit. In most cases, you just need to add water to bottles containing powdered dye and shake. Always read the instructions carefully before starting, though, just in case there are any additional steps or requirements.
Using the rubber bands as a guide, apply a generous amount of dye to each shirt section. If you are making a spiral tie dyed hoodie, apply color to each wedge in a pinwheel shape. For other patterns and techniques, follow the instructions carefully to guarantee the best possible result. Use the tip of the bottles to get into the folds of the fabric and ensure that you do not miss any spots.
Once you have fully saturated one side of the sweatshirt with dye, flip the shirt over, and apply color to the other side. It’s up to you whether you want to match the colors on the back to those on the front. However, keep in mind that if you use different colors in the same sections but on opposite sides of the shirt, they will mix in places. Avoid mixing colors that create muddy brown hues when combined (unless, of course, that’s the look you are going for).
Again, apply the dye liberally to ensure that the fabric is fully saturated. If you are used to using plain white t shirts for tie dye instead of sweatshirts or hoodies, be prepared to use more dye than usual. Thicker fabrics soak up color like a sponge, so you will need to apply more to yield vibrant results.
Letting the Dye Do Its Magic
This step might not be much fun, but it is essential. Unfortunately, it takes some time for the dye to work its magic, so you will need to let your shirt sit for a while before rinsing. Place the shirt in a grocery bag or trash bag, and tie the bag closed. If you are making multiple shirts, place each one in its own bag to prevent the colors from mixing.
The instructions included with your tie dye kit likely say to let the dye sit for six to eight hours. However, we recommend waiting even longer for the most vibrant results. Set the bag aside, and forget about it for 12 to 24 hours. This ensures that the dye has plenty of time to set and really stick to the fabric’s fibers. Trust us; it’s worth the extra wait!

Finishing Up
Once the dye has had plenty of time to set, it’s time to rinse. Put on another pair of gloves, and carefully open up the bag(s). Be sure to do this in an area that will not be damaged by drips of dye! Opening the bags in your bathtub or kitchen sink is the safest option.
Before removing the rubber bands, rinse out as much dye as you can using cool water. Rinse each section individually as much as possible. This helps keep the colors from running together. When the water starts mainly running clear, remove the rubber bands. If possible, avoid cutting them off. You don’t want to cut holes in your masterpiece accidentally!
Unbundle the shirt, and continue rinsing to remove any remaining dye. Wring out the water and repeat until the water runs clear. Take your time. You want to remove as much dye as possible before washing.
Toss the hoodie in your washing machine by itself or with other tie dyed garments from the same batch. Add a bit of laundry detergent, then wash using hot water and dry as usual. For the first several washes, you’ll need to wash your new tie dyed apparel by itself to avoid damaging any of your other clothing with residual dye. However, after a few washes, you can launder your tie dyed sweatshirts along with other colored clothing.
Keeping Tie Dyed Clothes Looking Great
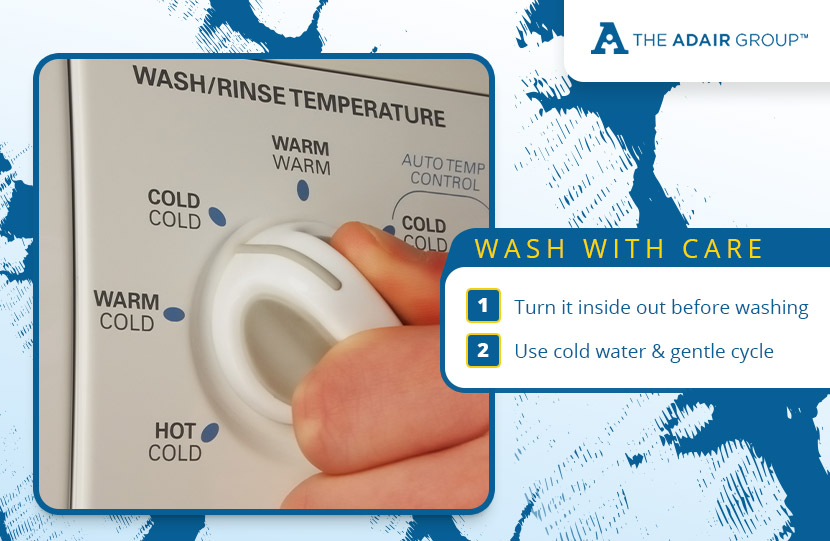
To keep your tie dyed top looking like new, wash it with care. Turn it inside out before tossing it in the washing machine to help prevent fading. And use cold water to keep the colors from bleeding. We recommend using gentle detergent and your machine’s gentle cycle, too.
Avoid washing tie dyed hoodies with heavy items like jeans that cause excessive friction.
As soon as the wash cycle ends, remove the shirt and hang it to dry or place it in the dryer. The longer a wet shirt sits in your washing machine, the more likely the colors will start to bleed out. If drying your shirt on an outdoor clothesline, make sure it is not exposed to direct sunlight as the sun’s UV rays can cause fading.
Closing Thoughts
We Have the Blank Apparel You Need for Making Tie Dye Shirts!
Whether you’re making them for yourself, to sell, or to give as gifts, tie dyed hooded sweatshirts are sweater weather must-haves. And once you’ve mastered the basics of how to tie dye a hoodie, you can apply those same techniques to customize sweatpants, socks, and other cozy apparel.
If you need blank hoodies, crewneck sweatshirts, or t-shirts for your next tie dye project, we have you covered! Shop The Adair Group today to browse our full selection of wholesale blank apparel from leading brands.
Image Credits
Natalie Guerrero Rueda/Shutterstock.com
silentwings_M_Ghosh/Shutterstock.com
ViDI Studio/Shutterstock.com
Mark Herreid/Shutterstock.com
Didecs/Shutterstock.com
Febriana Suwarningsih/Shutterstock.com

Popular Posts
- Birthday T-Shirts Are Easy and Fun!
What better day to talk about birthday t-shirts than on your birthday?! Today is MY birthday and I love thinking...
- The 5 Most Popular T-Shirt Colors Are....
Being in the t-shirt, business we get asked this question all the time. What are the most popular t-shirt colors? No...
- What is a Lift Gate Delivery Service?
When you order bulk t-shirts online, your shipping charges are calculated using the weight of your shipment and your d...
Categories
- All Things Adair
- Branded Apparel
- Buying Guide
- Celebrate Holidays With T's
- Clothing Maintenance
- Colors
- Creative T-Shirt Ideas
- DIY
- Fabrics
- Fruit of the Loom
- Hats
- Helping the Community
- History of T-Shirts
- Learn About Our Products
- Matching T-shirts
- Polos
- Scrubs
- Style
- Sweatshirts
- T-Shirts in Sporting Events
- Team T-shirts
- The 411 on the T-Shirt Business
- Tie Dye
- Uncategorized
- Underwear
- Wholesale Apparel