Can You Tie Dye a Colored Shirt: Guide to Tie Dyeing Colored Fabrics
 Whether you are new to the world of tie dye or have already made lots of tie dye shirts using plain white tees, you may have wondered if white shirts are the only option. You may have also asked about this if you prefer upcycling old shirts rather than purchasing new ones for your creations.
So, can you tie dye a colored shirt? What about dark-colored shirts? Or even black ones? The answer: Yes, yes, and yes!
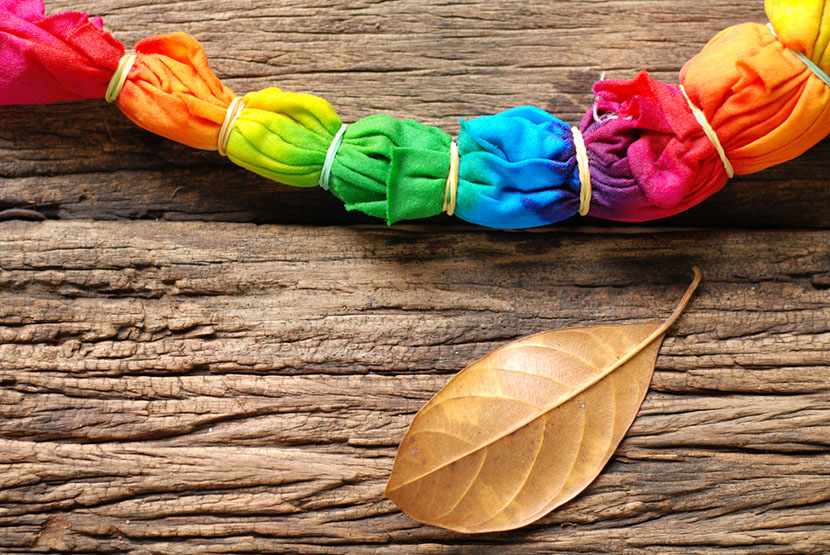
With the proper technique, it is possible to customize shirts of any color using tie dye. You can transform even your old black shirts into colorful and vibrant works of wearable art. In this article, we will be discussing the techniques for dyeing shirts that already have color on them. We will also be going over some tips and tricks to help you take your tie dye skills to the next level. Let’s get started!
Shop Blank T Shirts for Tie Dye from The Adair Group!
What You Should Know Before Tie Dyeing Colored Fabrics
While it’s possible to tie dye shirts of any color, there are a few important things to take note of before you get started. First, there are two primary methods of dyeing fabric that already has color. When working with light, pastel shirts, you can tie dye directly over the existing color. However, if you go this route, the result will be a mixture of the current color and the color of any dye you add. For example, purple will be the resulting color if you’re working with a light blue shirt and add red dye. When applying the dye, it is vital to keep this in mind, so you don’t inadvertently mix the wrong colors and create a muddy mess.
Keep in mind, though, that redyeing only works if the dye you add is darker than the original color of the shirt.
The other option is removing the color from the fabric before applying dye. You can skip this step when working with pastel-colored shirts, but it is a must for darker colors and black. Removing color requires the use of a bleaching agent. And since these products are toxic and can be dangerous to work with, you’ll need to be careful when using them.
Unfortunately, the caustic nature of bleaching agents means they can damage fabric, too. Products like chlorine bleach and color remover are not safe to use on synthetic fibers, including polyester, spandex, and nylon. They damage animal fibers, like silk and wool, too. Before applying a bleaching agent, check the tag to determine the fabric content. If the shirt is made from any of the fibers mentioned above, you most likely cannot remove the color safely.
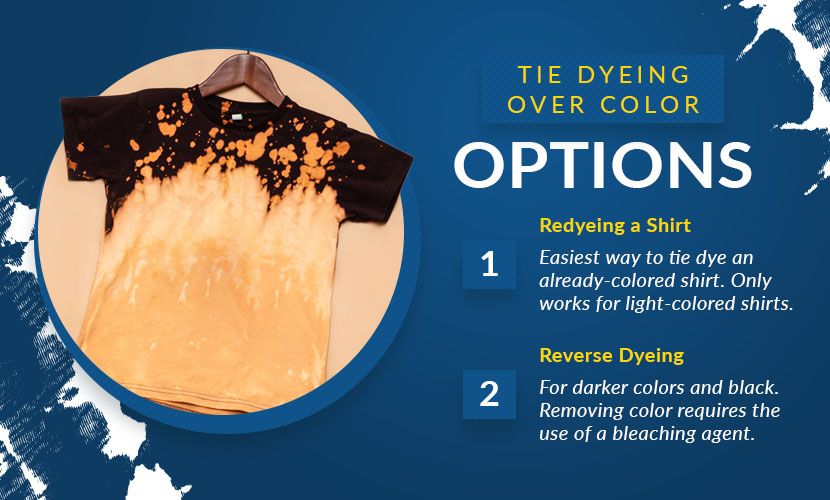
Redyeing a Shirt
Redyeing is the easiest way to tie dye an already-colored shirt. As mentioned previously, though, this only works for light-colored shirts. You don’t need to start with a solid-colored shirt, though. If you have a tee that you have previously tie dyed using light colors, you can dye it again using more vibrant hues to create a distinctive one-of-a-kind look. Adding a second layer of tie dye is a fun and easy way to take your designs to the next level. Plus, it’s a great way of “fixing” a garment that did not turn out quite as you had hoped.
Start by washing your shirt using regular detergent. Do not use any fabric softener as these products leave a residue that can negatively impact the dying process. With the shirt damp, fold it into the pattern of your choosing. You can follow a specific tie dye pattern, or you can get creative with strings or rubber bands and see what happens. Carefully apply dye to both sides of the shirt, then let it sit for several hours. The longer you let the dye set, the more vibrant the colors will be on the finished shirt. Rinse in cool water until the water runs clear. Finally, wash using hot water and regular detergent.
Reverse Dyeing
To tie dye a black or dark-colored shirt, you will first need to remove some of the color using a bleaching agent. Bleaching the fabric ensures that the dye you add later will show up. Reverse dying a dark shirt allows you to create designs that stand out among typical tie dyed shirts made using white tees.
There are a few different bleaching agents from which to choose:
Chlorine Bleach
Regular household bleach (like Clorox) destroys most types of dye. It destroys synthetic fabrics and animal fibers, too, so be sure to check your garment’s tag before starting. Cotton is somewhat resistant to bleach, but you still need to be careful to avoid damaging the shirt. If you leave the bleach on for too long, it will slowly eat away at the fabric and cause holes.
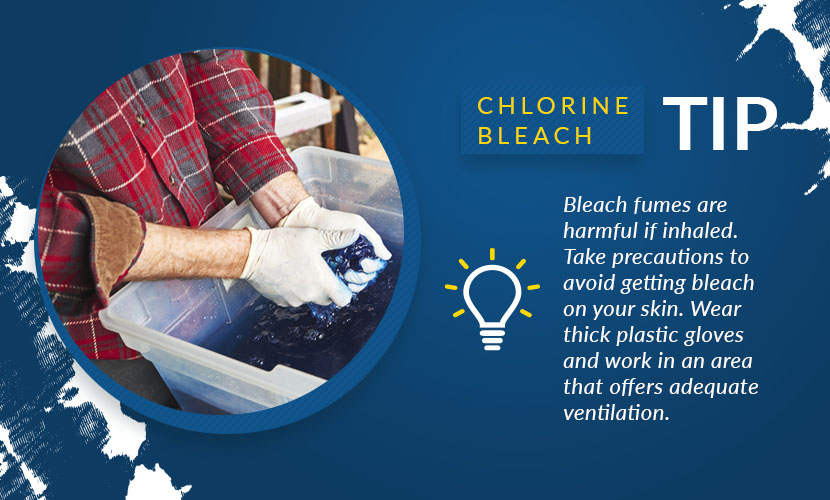
Bleach fumes are harmful if inhaled, and you should take precautions to avoid getting bleach on your skin. If you are going to use this method, wear thick plastic gloves and work in an area that offers adequate ventilation. We recommend wearing a respirator (not a dust mask), too, to protect your lungs.
Prepare your shirt by washing it. When bleaching, the fabric can be dry or slightly damp. Fold and tie the shirt as desired. When folding, consider what design you would like to create. If you plan on making a spiral tie dyed shirt, for example, you’ll want to fold and tie the shirt as you would if you were adding the dye instead of bleach.
Carefully mix your bleach in a solution of 10 parts water to one part bleach. Then, apply the solution to the shirt, making sure to thoroughly saturate the fabric. A spray bottle works well for this. Just be sure to avoid spraying the solution on any materials or surfaces you don’t want to bleach. Keep a close eye on the shirt, and rinse it thoroughly once it has sufficiently lightened. The amount of time this takes varies. However, we do not recommend leaving the bleach on for more than 30 minutes, as fabric damage is likely to occur.
Rinse the shirt in cold water, then launder to ensure that all bleach has been removed. Once the shirt is clean, you are ready for the fun part: Adding color!
For this step, your shirt needs to be damp but not soaking wet. Lay it out on a flat surface, and smooth out the wrinkles as much as you can. Then, start applying dye to the bleached areas. When you are finished with one side, flip the shirt over and dye the reverse side. Let sit for several hours, then rinse and wash your shirt.
Color Remover
Sodium hydrosulfite, more commonly known as Color Remover, is an attractive alternative to chlorine bleach. It is less damaging to fabric, and unlike chlorine bleach, it can be used on wool, silk, and nylon (as long as you are careful). Instead of destroying the molecules that make up dye, these products remove color by breaking down the bonds between fabric and dye.
Two of the most common brands of sodium hydrosulfite are Carbona Color Run Remover and Rit Color Remover. If you decide to use one of these products, read the instructions on the packaging carefully. While these products are not as dangerous as chlorine bleach, you still need to be careful when using them.
After removing the color from your shirt using a Color Remover, rinse in warm water until the water begins to run clear. Then, wash in warm water using a mild detergent. Once it has been laundered, the shirt is ready to be redyed.
Tips and Tricks for Taking Your Tie Dye to the Next Level
Tie dye is huge right now, and just about everyone has at least one or two tie dyed shirts hanging in their closet. If you want your creations to stand out, you need to step up your game and take your skills to the next level. Learning how to make basic tie dyed shirts is easy, but with some practice and patience, you can create eye-popping designs that will turn heads for all the right reasons. Check out these tips for enhancing your skills!
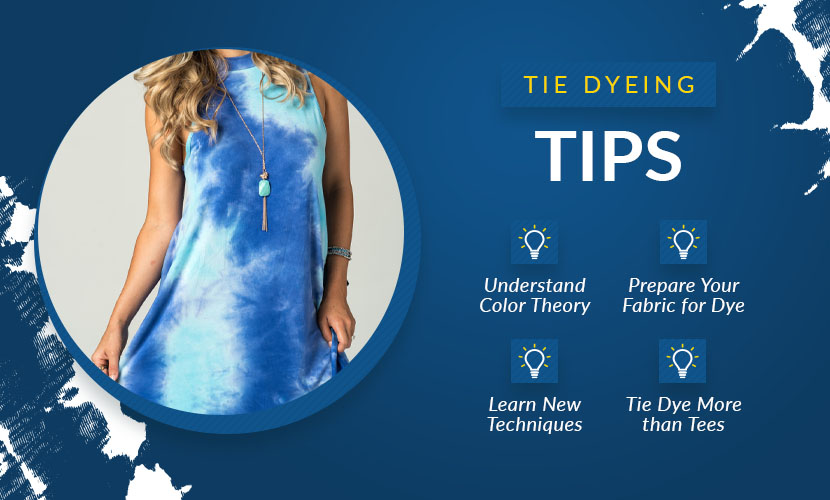
Understand Color Theory
You don’t have to be an art student to understand the basics of color theory. And learning how colors work together and mix is one of the best ways to make your shirts pop. There are three primary colors: red, yellow, and blue. These colors are combined to form the secondary colors, green, orange, and purple. And tertiary colors are formed by mixing a primary color with a secondary color. All colors are derived from the three primary colors. Unfortunately, mixing the wrong colors together results in a muddy shade of brown, which is something that is best to avoid when making tie dyed shirts.
When learning about colors and how they work together, consider consulting a color wheel. Colors that complement each other are located on opposite sides of the wheel, and colors that are next to each other on the wheel are analogous. Both complementary colors and analogous colors work well for creating aesthetically pleasing tie dyed shirts.
Prepare Your Fabric for the Dye
Even if you are working with a brand-new shirt, it could be coated in oils and other materials from the manufacturing and shipping processes. To ensure the best possible results, we recommend prepping your shirts using soda ash before dying them. To do this, you’ll need soda ash, detergent, and a large pot of water.
Combine all of the ingredients in the pot. For each gallon of water, add one to two teaspoons of detergent and two to three teaspoons of soda ash. Mix thoroughly, then add your shirt. Heat the solution, and let simmer for up to four hours. Rinse thoroughly, squeeze out the excess water, and your shirt is ready for dye.
Learn New Techniques
You have probably already mastered the techniques for making spirals, stripes, and other common tie dye designs. If you want your work to stand out, though, you will need to step up your skills and learn some additional techniques. There are all sorts of different tie dye patterns and folding techniques to choose from, and they allow you to make everything from hearts and aliens to eyes and skulls. If you are feeling extra creative, you can even come up with your own patterns and techniques. And in doing so, you will be designing one-of-a-kind tie dyed shirts that you will be proud to show off.
Find Stylish Tie Dye Shirts at The Adair Group
Tie Dye More than Tees
When most folks think about tie dye, they think about t-shirts. And while there is nothing wrong with stocking up on bulk t shirts to tie dye, they certainly are not the only thing that you can customize using this popular technique. If you are getting tired of the same old projects, consider trying your hand at dyeing something new. Hats, hooded sweatshirts, and even shoes can all be tie dyed, and the results are quite stunning.
Consider branching out even further and dyeing household textiles and linens. Cotton sheets, tapestries, and shower curtains are all great options, and these products make excellent gifts for anyone who loves vibrant colors. They are a fantastic way to breathe some life into your own home, too!
Conclusion
If you are planning on making tie dyed shirts, you don’t have to stick to buying white t shirts for tie dye. With the proper technique, you can redye or reverse tie dye shirts of any color. Whether you purchase bulk wholesale t-shirts in a variety of colors or raid your closet to find old colored shirts to repurpose, redying and reverse tie dyeing are fun projects that always yield impressive results. And once you have mastered these techniques on t-shirts, be sure to try them out on other garments and textiles!
Image Credits
Sunspire/Shutterstock.com
xnova/Shutterstock.com
fitzcrittle/Shutterstock.com
Svetlana Chugaeva/Shutterstock.com
Brian Goodman/Shutterstock.com
theshots.co/Shutterstock.com
VLADIMIR VK/Shutterstock.com
P-fotography/Shutterstock.com

Popular Posts
- Birthday T-Shirts Are Easy and Fun!
What better day to talk about birthday t-shirts than on your birthday?! Today is MY birthday and I love thinking...
- The 5 Most Popular T-Shirt Colors Are....
Being in the t-shirt, business we get asked this question all the time. What are the most popular t-shirt colors? No...
- What is a Lift Gate Delivery Service?
When you order bulk t-shirts online, your shipping charges are calculated using the weight of your shipment and your d...
Categories
- All Things Adair
- Branded Apparel
- Buying Guide
- Celebrate Holidays With T's
- Clothing Maintenance
- Colors
- Creative T-Shirt Ideas
- DIY
- Fabrics
- Fruit of the Loom
- Hats
- Helping the Community
- History of T-Shirts
- Learn About Our Products
- Matching T-shirts
- Polos
- Scrubs
- Style
- Sweatshirts
- T-Shirts in Sporting Events
- Team T-shirts
- The 411 on the T-Shirt Business
- Tie Dye
- Uncategorized
- Underwear
- Wholesale Apparel