6 T-Shirt Crafts and Upcycling Ideas to Try

T-shirts are undeniably awesome. They are comfortable, stylish, and affordable and, with proper care, they can withstand a lot of use. Nothing lasts forever, though, and even top-quality shirts can suffer from stains, snags, and other issues that make them unwearable. When you have old shirts you no longer wear cluttering up your closet, you are faced with a dilemma. It feels wrong (and wasteful) to just throw an old shirt in the trash, even if it is no longer wearable in its current state. But at the same time, keeping it around wastes space that could be used to house your new favorite shirt.
So, what do you do?
Whether it’s the band shirt you bought at your first concert back in your high school days, tie dye shirts you made with your best friends in college, or even a rainbow of bulk t-shirts your kids wore when they were little, there are ways to breathe new life into those much-loved but no-longer-wearable t-shirts. Keep reading to discover some amazing t-shirt crafts and upcycling ideas to try!
Tie Dyed Shirts
Tie dyeing is one of the best ways to give a stained shirt a brand-new lease on life. And while you might think that this project only works for white or light pastel shirts, even black (yes, black!) shirts can be tie dyed.
If you have white or light-colored shirts that you’d like to tie dye, just purchase a regular tie dye kit, read the instructions, and you’re good to go. If you have dark-colored or black shirts, though, you will need to do some extra prep work.
Start by folding the shirt as desired. Scrunching it up randomly or twisting it to create a spiral shape usually works best for beginners, but feel free to try out other tie dye patterns and techniques. When you are finished folding, twisting, and scrunching, secure the shirt using rubber bands.
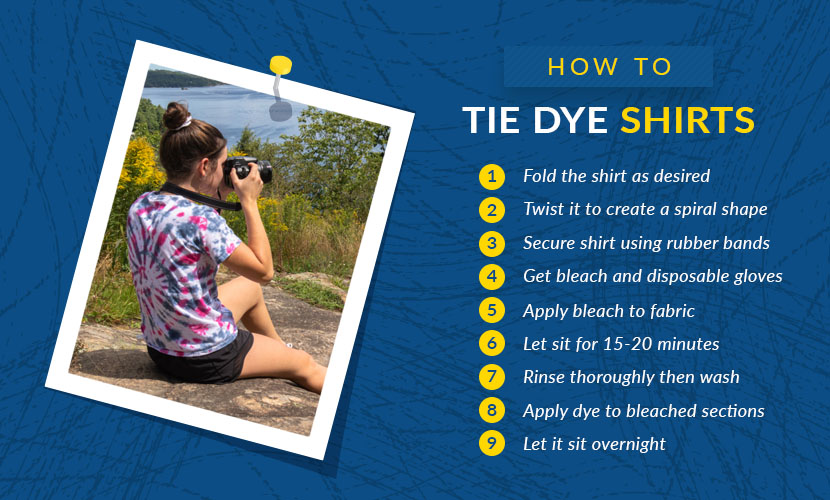
For the next step, you’ll need bleach toilet cleaner and disposable gloves. If you don’t have bleach toilet cleaner, a 50/50 mix of regular bleach and water works, too. Put the gloves on, and then carefully apply the bleach toilet cleaner to the fabric. For safety, this should be done in a well-ventilated area. Spread the bleach all over the shirt, and then let sit for 15 to 20 minutes. Don’t leave the bleach on for too long, as it could damage the fabric.
Rinse thoroughly, and then wash with detergent to remove any remaining bleach. After washing, the bleached sections will likely have an orangish color. That’s okay! Now, lay the shirt out on a flat surface and apply colored dye to the bleached sections. Take your time, and make sure the dye saturates the fabric. When finished with one side, flip the shirt over and dye the other side.
Carefully place the shirt in a plastic grocery bag, and let it sit overnight. Rinse, wash, dry, and your one-of-a-kind new shirt will be ready for wear. Who says only white shirts can be tie dyed?
Shop Our Selection of Tie Dye Shirts!
T-Shirt Pillow
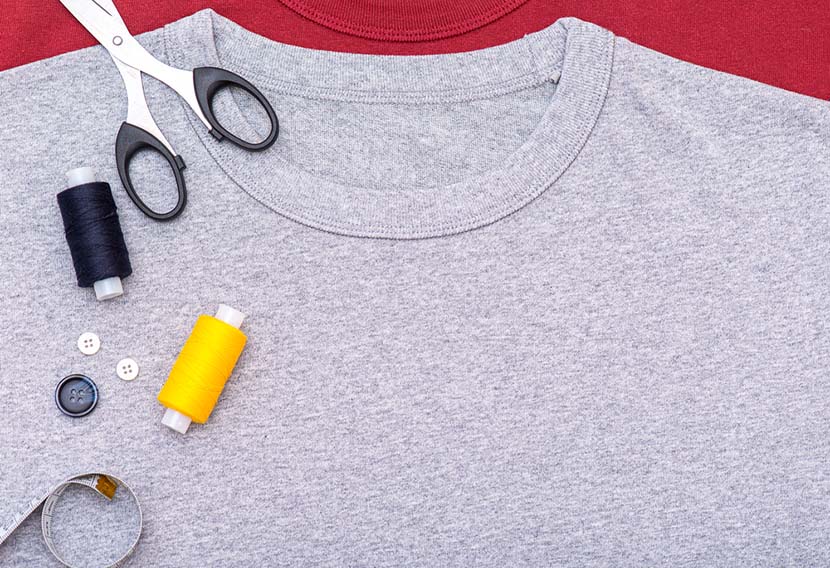
Sometimes, letting go of a special shirt is incredibly difficult. Transforming an old tee into a pillow is a great way to prevent an old favorite from being buried in the back of your closet or sent to a landfill. Making t-shirt pillows is easy, too, and does not require advanced sewing skills.
For this project, you will need:
- A T-Shirt
- Straight Pins
- Stuffing
- Thread
- Fabric Scissors
- Sewing Machine
You don’t need a fancy sewing machine. As long as you have one that can sew a straight stitch, you’re good to go! You can, of course, stitch your pillow up by hand if you prefer. Using a machine is just easier and speeds up the process.
Start by cutting off the sides of the shirt, leaving the center with the design and the collar. Next, cut just below the collar to remove the top. At this point, you should have just the square or rectangle-shaped front and back of the shirt. Leave the bottom hem intact.
Flip the pieces so that the right sides are facing each other and pin around the edges. Place the pins far enough from the edges to leave yourself enough room to sew. When finished, sew around the edges, leaving roughly a ½-inch margin. Leave the bottom edges open so you can stuff your pillow.
Turn your pillow right side out, and then fill it with as much stuffing as you desire. Be sure to fluff it around a bit to make sure you like how it feels. When you are done stuffing your pillow, carefully sew across the bottom about ¼ of an inch away from the edge. If you’d like to make the edges more consistent, sew around the other three sides about ¼ of an inch away from the edge. This creates a nice, even edging.
And there you have it! In just a few simple steps and about 15 minutes of your time, you have transformed an old t-shirt that was probably destined for the trash bin into a fun and comfortable pillow.
No-Sew Rag Rug
If you have a few shirts that you would like to upcycle all at once, consider using them to make a no-sew rag rug. Once you have mastered the basic technique, you can create stylish and colorful rugs of all sizes using nothing more than shirts, scissors, and your own two hands. If you would like to give this fun project a try, check out the full tutorial (including videos) from Sew 4 Bub.
T-Shirt Produce Bags
Upcycling t-shirts is environmentally friendly and so much better than sending your old attire off to a landfill. You can take your environmental impact even further by using your old tees to make new produce bags that you can take to the store with you instead of using plastic bags. This project is super easy, and it is an awesome way to lessen your environmental impact now and every time you head to the grocery store.
For this project, you will need a t-shirt, scissors, ribbon, and a ruler. When choosing a t-shirt, any size works. Even baby onesies and toddler tees work great for creating smaller bags for things like berries.
Start by trimming the shirt into a rough bag shape. Cut off the neck and sleeves to create an arch shape at the top. Leave the bottom hem intact.
Next, mark where you would like to make cuts. Start roughly one inch from the bottom of the shirt, and make a row of one-inch marks with roughly an inch in between each mark. Move up an inch, and repeat. Be sure to alternate the placement of the marks every other row so they do not line up. Leave about the top four inches unmarked. Then, place one larger mark in the center of the unmarked space to indicate where your hand or arm will go. Carefully cut along each mark. Below the first row of horizontal cuts, make a row of small vertical cuts.
Lay the bag out flat, and carefully weave the ribbon through the bottom row of cuts. Pull the ribbon tight, and tie it securely to close the bottom of the bag. Finally, flip the bag so the ribbon is on the inside.
T shirt produce bags are great because they are lightweight and easy to care for. They are good for the environment, too, and allow you to get more use out of old shirts that may have been destined for the trash can.
T-Shirt Scarf
Making a scarf out of old t-shirts allows you to transform your old tops into a stylish new accessory. There are a lot of ways to tackle this project, but this method is one of the fastest and easiest. It also yields awesome results.
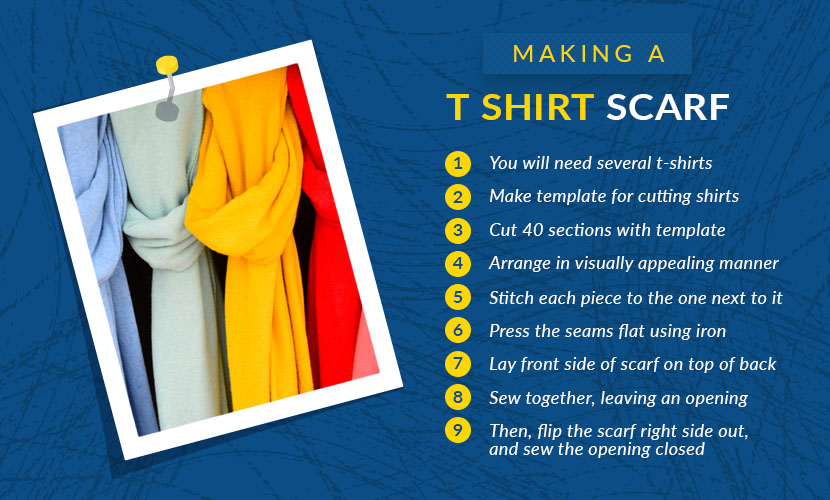
To get started, you will need several t-shirts. Graphic tees are great for making a scarf with a lot of visual appeal, but solid-colored tees work, too. Or you can mix and match plain and printed tees. It’s entirely up to you. You will also need a standard No. 10 envelope, a piece of cardstock, fabric pencils, and scissors. Additional supplies include a sewing machine, thread, and an iron.
Wholesale T-Shirts Are Great for Crafting!
Center the envelope on the cardstock, and track around the edges. Cut out the center so you are left with a rectangular frame. This is the template you will use for cutting your shirts. Lay each shirt out flat, and place the template over top to figure out where you will cut rectangles to use in the scarf. Depending on the shirts’ size and how you place the template, you should be able to get a few rectangles out of each.
Trace the rectangles, and then cut the pieces to use for your scarf. You’ll need around 20 sections for the front of your scarf and the same number for the back. The solid-colored backs of the shirts work well for the back of the scarf.
Arrange the rectangles in a visually appealing manner to create the front of the scarf. Once you have figured out the layout, stitch each piece to the one next to it on the long side, leaving ¼-inch seam allowances on the back. After all the front pieces have been stitched together, press the seams flat using your iron.
Next, arrange the pieces that will form the back of the scarf, and stitch them together. Press flat. Now, lay the front side of the scarf on top of the back side with the right sides facing each other. Sew together, leaving an opening so you can turn the scarf right side out. Trim away the excess fabric, and cut angles at each corner. Then, flip the scarf right side out, and sew the opening closed.
Finally, press the scarf for a smooth finish. This project is a great way to upcycle the old t-shirts you have cluttering up your closet or dresser. However, it’s also an awesome way to breathe new life into thrift store finds. Look for shirts with interesting designs to create an amazing, eco-friendly scarf that you will love showing off.
Braided Bracelets
Turn old tees into adorable wrist accessories by cutting them into strips, braiding them together, and adding some funky wooden beads. Cut shirts into long strips that are roughly 1 to 2 inches wide. Stretch them out so the edges begin to curl. Take three strands, secure one end, and start braiding. After about six inches, add a few beads to the outside strand of the braid. Continue braiding until the bracelet is long enough to wrap around your wrist three times.
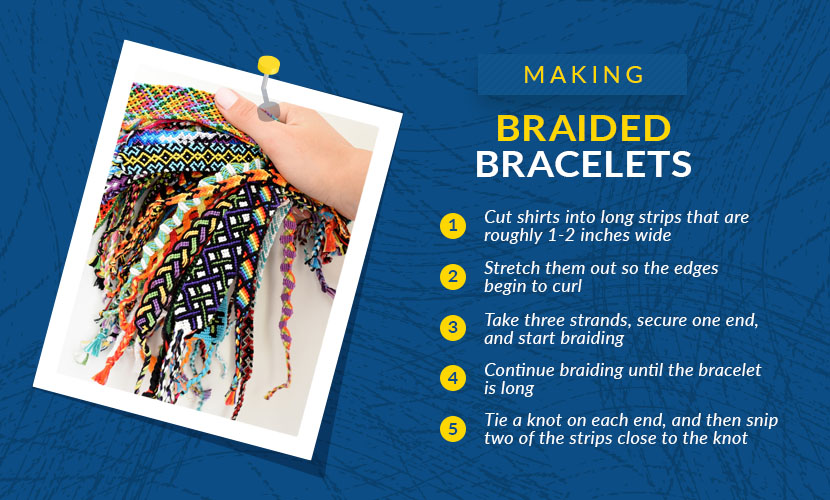
Tie a knot on each end to create a closure, and then snip two of the strips close to the knot. Use the piece left behind to tie the bracelet on your wrist. Trim away any excess fabric. Because the bracelet is made from t-shirt fabric, it should be stretchy enough to easily slip on and off your wrist.
Conclusion
When it comes to transforming old t-shirts into something brand new, the options are virtually limitless. With a little bit of creativity and some basic crafting supplies, you can use these wardrobe staples to make everything from new apparel and accessories to home décor or a new bed for your four-legged best friend. No matter what you make, getting crafty and upcycling your old tees reduces waste and is much better for the planet than throwing worn-out garments in the trash. And, of course, if you are running low on supplies, bulk wholesale t-shirts and plain sweatshirts work great, too.
Try one of the projects outlined above, or get creative and see what you can come up with. Whether you’re working with old shirts or brand-new bulk apparel, crafting with tees is fun and enjoyable for people of all ages and skill levels.
Image Credits
Darth_Vector/Shutterstock.com
ed2806/Shutterstock.com
Savvapanf Photo/Shutterstock.com
IgorGolovniov/Shutterstock.com
Natasha-Aleksandra/Shutterstock.com
Tanya_Terekhina/Shutterstock.com
karen burgess/Shutterstock.com

Popular Posts
- Birthday T-Shirts Are Easy and Fun!
What better day to talk about birthday t-shirts than on your birthday?! Today is MY birthday and I love thinking...
- The 5 Most Popular T-Shirt Colors Are....
Being in the t-shirt, business we get asked this question all the time. What are the most popular t-shirt colors? No...
- What is a Lift Gate Delivery Service?
When you order bulk t-shirts online, your shipping charges are calculated using the weight of your shipment and your d...
Categories
- All Things Adair
- Branded Apparel
- Buying Guide
- Celebrate Holidays With T's
- Clothing Maintenance
- Colors
- Creative T-Shirt Ideas
- DIY
- Fabrics
- Fruit of the Loom
- Hats
- Helping the Community
- History of T-Shirts
- Learn About Our Products
- Matching T-shirts
- Polos
- Scrubs
- Style
- Sweatshirts
- T-Shirts in Sporting Events
- Team T-shirts
- The 411 on the T-Shirt Business
- Tie Dye
- Uncategorized
- Underwear
- Wholesale Apparel