How to Tie Dye a Hat
Tie dye never goes out of style. It’s always a solid style choice, but, sometimes, the funky designs are more popular than others. Right now, tie dye is having a huge moment, largely due to the sheer number of people who took up the hobby as a means of busting boredom in the early days of the COVID-19 pandemic. For lots of folks, though, dying bulk wholesale t-shirts isn’t as much fun as it used to be.
Source: Dani Simmonds/Shutterstock.com
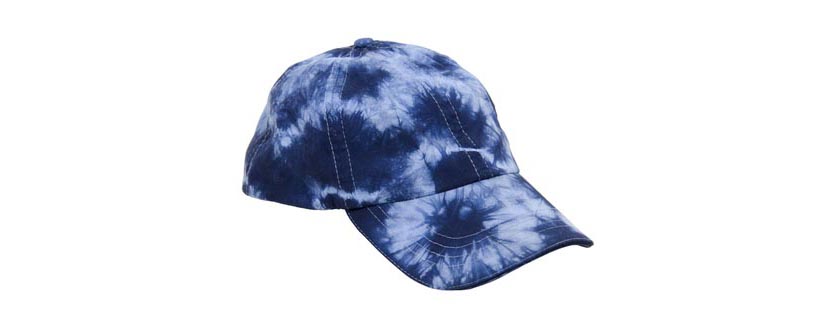
If you are tired of making tie dye shirts, you might want to try your hand at making a tie dyed hat instead. Rather than making swirls and spirals, though, the ombre method is the technique that tends to work best for baseball caps. Keep reading to learn how to tie dye wholesale hats from The Adair Group!
Supplies
Only a few basic supplies are needed for making one-of-a-kind tie dye hats, including:
- 100% cotton white baseball cap
- Tie dye kit
- Disposable gloves
- Sponge brushes
You also want to make sure you have some type of plastic — such as a large trash bag or plastic table cloth — to cover your work surface. It’s a good idea to add a layer of paper towels or newspaper on top of the plastic to absorb liquid.
Bulk Wholesale T-Shirts Are Great for Tie Dye
Get Ready

Source: F16-ISO100/Shutterstock.com
Wash and dry your hat to remove any chemicals that may be lingering from the manufacturing process. Cover your work surface, and put on disposable gloves and old clothes you don’t mind staining.
Prepare the dye according to the instructions included in the kit. For this project, you will need three colors. Choose a dark color, a medium color, and a light color.
Apply Dye to the Bill of the Hat
Gently squirt a bit of your darkest dye onto the front of the cap’s bill. Then, carefully spread it out using a sponge brush. Repeat until you have spread the dark color all over the bill and about an inch up the hat.
Dye the Rest of the Hat
Next, wad up paper towels and stuff them inside the hat. This will make the hat easier to handle as you apply more dye. Carefully apply the medium color to the hat beginning where the dark color ends. Spread upward until only about a third of the hat has not been colored.
Finally, use the light color to fill the rest of the hat. When you are finished, flip the cap over and apply dye to the adjustment strap on the back. You might want to apply some dye to the inside rim or the interior of the hat, too.
Give the Dye Time to Set

Source: Min C. Chiu
Carefully place the hat inside a plastic bag and set it aside overnight. You might want to put the bag outside or in an old bucket just in case it leaks. You don’t want to end up with dye all over your house!
The following day, take the hat out of the bag and rinse. Use cold water, and continue rinsing until the water runs clear. This can be done outside with a garden hose or in a utility sink. If you do this in your bathroom or kitchen sink, however, you could end up with stains that are nearly impossible to remove.
When finished, wash your hat by itself on a normal cycle. Dry in the dryer, or hang to dry. Congratulations! Your new tie dyed hat is ready for wear.
Learn How to Wash a Tie Dye Shirt
Keep It Looking Great
Caring for tie dyed apparel and accessories can be tricky. That is why it is important to know the correct way to wash them. The dye from your hat may run every time it is washed, so it is best to wash it alone or with other tie dyed items. Launder using cold water and a gentle detergent. To maximize the longevity of your new headwear, you might want to consider using the delicate cycle, too.
When drying, take care to avoid shrinkage. Hats made from 100% cotton should not be dried using high heat. And, if hung out to dry, they should be placed in a shady area so the sun doesn’t cause the dye to fade.
Conclusion
If you love tie dye but are wanting to make something other than a t-shirt, making a hat is a great alternative. Once you’ve mastered this basic ombre technique, feel free to experiment with other designs and let your creativity run wild.

Popular Posts
- Birthday T-Shirts Are Easy and Fun!
What better day to talk about birthday t-shirts than on your birthday?! Today is MY birthday and I love thinking...
- The 5 Most Popular T-Shirt Colors Are....
Being in the t-shirt, business we get asked this question all the time. What are the most popular t-shirt colors? No...
- What is a Lift Gate Delivery Service?
When you order bulk t-shirts online, your shipping charges are calculated using the weight of your shipment and your d...
Categories
- All Things Adair
- Branded Apparel
- Buying Guide
- Celebrate Holidays With T's
- Clothing Maintenance
- Colors
- Creative T-Shirt Ideas
- DIY
- Fabrics
- Fruit of the Loom
- Hats
- Helping the Community
- History of T-Shirts
- Learn About Our Products
- Matching T-shirts
- Polos
- Scrubs
- Style
- Sweatshirts
- T-Shirts in Sporting Events
- Team T-shirts
- The 411 on the T-Shirt Business
- Tie Dye
- Uncategorized
- Underwear
- Wholesale Apparel