How to Tie-Dye a Shirt

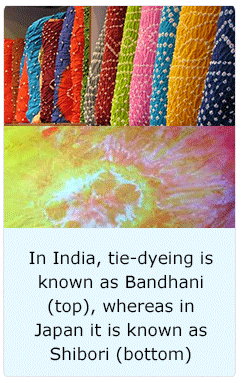
 The Indian technique involves tying extremely small points on the cloth with thread in a particular pattern, and then dip-dyeing them. This resulted in tiny dotted patterns on the cloth. Bandhani was practiced by the Muslim Khatri Community in Kutch, India. The Indian tie-dyeing form was extremely intricate, due to the different patterns involved, such as Leheriya, Mothra, Ekdali, and Shikari.
The Japanese version is very similar to the modern day tie-dye art, but, instead of bright hues, the Japanese used only indigo pigmentation in their garments, which are usually made out of hemp or silk. Shibori, the Japanese version of tie-dye, were among the goods donated by the Emperor Shomu to one of the Seven Great Temples in Nara.
The ancient Chinese also used tie-dye and wood strips, squares, chopsticks, and, of course, string to divide the color from the non-color sections. Tie-dyeing reached its peak in the Tang Dynasty when it became fashionable for the upper class to wear clothing with these designs.
The hippie movement brought in tie-dye as a form of expression and to break free from the social norms of the 1950s and early 60s. The tie-dye in America represented the free-spirited nature of the youth, of psychedelic rock, and of the sexual revolution.

The process of tie-dyeing involves using various folding, pleating, crumpling, and twisting techniques, and then binding these sections with rubber bands. Dye is applied to these sections. This part is called the “resist,” because the dye is prevented from coloring the bound part of the fabric.
Tie-dyeing usually involves using bright, primary colors to create bold patterns. More sophisticated and advanced tie-dyeing techniques involve various steps and using different other types of resists, apart from just binding with rubber bands.
![]()
TIE-DYING 101
Before we go pro on tie-dyeing a shirt, here’s a short basic to get you started:

The Kit
You need to get your supplies ready for any tie-dyeing business; otherwise, things are bound to get messy, although it is fun! You can purchase a tie-dyeing kit at any craft store, purchase it online, or gather up the supplies on your own. Your kit should include protective gloves (because nobody wants stained hands), rubber bands, and fabric dye.

Choose natural fiber over a synthetic one, because it has a better absorbency rate. Pick shirts that are cotton, rayon, or silk for best results.

The Design
Get your creative juices flowing! Colors play an important role in tie-dyeing, so you want colors that go well with each other; ones that are robust, bright, and cheerful. Look for a design that you like, and then choose the colors you want.
TIPS & TRICKS
| Washing the fabric before tie-dyeing is important, as it removes the sizing (a protective chemical that keeps the shirt looking fresh and wrinkle-free in the store). It also removes softeners, oils, and other elements that could affect the absorbency rate of your fibers. | Use plastic to cover your work area so you don’t have dye stains on your furniture. | Tie-dye while your fabric is still damp from the washing. | |||
| Zip ties and rubber bands are great binding items. | Use a wire rack when dyeing, as it prevents the colors from muddying while the dye sets. | Use plastic to cover the dyed fabric so it stays damp while the dye sets. The fabric should set for at least 6 to 8 hours so the colors come out bright! | |||
| Immediately clean all the containers used in your tie-dyeing session with hot water and soap. | The first few washes of your tie-dyed garments need to be washed separately in cold water, as they might bleed. | Adding small amounts of sodium alginate or Super Clear liquid thickener will make the dye mixture less viscous. It slows down the rate at which the dye spreads. This is helpful if you want to create sharper edges. | |||
| Natural fibers are always the better option when it comes to tie-dyeing. Fabrics such as cotton, rayon, hemp, linen, and ramie are great options. If you can’t find natural fiber shirts, then look for fabric that has 90% cotton with 10% polyester or lycra. Avoid blends that come in 50/50, or your colors will come out very pale. | |||||

HOW TO TIE DYE A SHIRT
Once you have the basics covered, it’s time to tie-dye like a pro! There are several techniques that you can use to create different patterns and shapes. It really depends on what kind of look and result you want.

The Bulls-Eye Effect
For this technique, tie a rubber band around a pinch of cloth right at the center of the t-shirt. Pull the pinch into a cone shape. The more fabric, the bigger the bulls-eye. Tie in another rubber band 2 inches away from the band. Continue this step to add in as many rubber bands as you want. The more the bands, the more the rings you create. Use a squeeze bottle to apply your desired dye color to the different sections you have created. Leave the dye to set for at least 8 hours, rinse the shirt with warm water, and let it dry.

The Shibori Effect
The Shibori effect creates unique squiggly lines on your t-shirt. Shibori is the ancient Japanese art of tie dyeing. What you need is a PVC tube or any kind of non-absorbent tube. Roll your t-shirt onto the tube. Scrunch both ends of the t-shirt—you can do this very tightly (for thinner lines) or loosely (for bigger lines). Secure both ends with a rubber band. Then take a squeeze bottle and apply your colors. Let the colors set for at least 6 to 8 hours. Wash the fabric separately in cold water and leave it to dry.

The Spiral Effect
The Spiral tie-dye method is the most recognized and popular of all tie-dye methods. To do this, you need to pinch your fabric at the point where you want your spiral to start. From here, carefully twist your shirt until the very end. Using rubber bands, create 6 to 8 wedges on the cloth (sort of like a pizza). Apply your desired dye color to each wedge using a squeeze bottle. Once you are happy with your product, leave it to set. After 8 hours, wash the fabric in cold water and leave to dry.

The Sunburst Effect
The Sunburst effect needs some fabric pinching done at random places on the t-shirt. Secure with rubber bands and apply the dye to pinched sections of the fabric. You can either leave the remainder of the t-shirt in its original color, or you can apply a different colored dye to the rest of the t-shirt. Usually, the sunburst effect works best when the sunburst is in a bright color and the overall t-shirt is in a darker hue. As always, leave to set, wash, then dry.

The Ombre Effect
This effect is great if you want to add some color to your plain tees but still keep the design subtle. For this effect, you also need a paint brush. Starting either at the bottom or the top of the shirt, create a layer of color by squeezing your dye along the fabric’s edge. Then, using a damp brush, brush the color either upwards or downwards from your dye edge. This will create the gradient look. Repeat this process using different colors along the t-shirt, but make sure you change your water whenever you start a new color. Ombre effects work great not only for t-shirts, but shoes and canvas bags, as well.

The Heart Effect
This technique needs a little bit more effort than other tie-dyeing methods. First, fold your t-shirt in half, and then, using washable marker, trace the outline of half a heart on each side of the fold. Tightly pleat the shirt along the marker line and secure the pleated fabric with a rubber band. After this, use rubber bands to bind the rest of the fabric. These parts will form the outer colors of your heart. Apply the dye using a squeeze bottle. The Heart effect is a great way for creating DIY wedding favors on t-shirts or bags.

The Watercolor Effect
The Watercolor effect may not exactly be tie-dyeing, but it does involve dyeing a plain fabric. As with all techniques, make sure your t-shirt is damp for the dyeing. Squeeze dye into a plastic container and, using a wet brush, dip the ends into the dye and brush the dye on the t-shirt. This will create the brush stroke designs on your shirt. Continue this step with other colors to create your desired look.

The Spider Effect
For this effect, prepare your t-shirt as you would do in the Spiral effect by twisting the shirt and then creating the wedges. After this, using a squeeze bottle, color each wedge with your desired color. Squeeze bottles are a great tool for tie-dyeing, as it allows you to control the amount of liquid to seep into the cloth. Flip the spiral and color each wedge with its corresponding color. After this, using black dye, completely cover one side of the t-shirt in black. Cover the t-shirt in plastic and let the color set for 8 hours. Rinse, then hang to dry.

The Folding Effect
This technique involves a systematic way of folding to get a geometric type result. You need to create at least 8 panels of folds. Start by folding the t-shirt in half, and then fold that half into a quarter, and then fold again to achieve 8 panels. Apply your desired color to the edge of the squares. The final result will give a tiled look to your t-shirt design.

The Crumple Effect
This technique is the easiest of all to do. If finding a quick solution to upgrade your t-shirt is what you want, then use the crumple method. Crumple your fabric to create your desired effect. Once you have achieved the crumple you like, squeeze dye directly onto the crumpled parts. Once you have covered one side, do it on the other side. The tighter the crumple, the more pronounced the effect. Let the colors set in properly before rinsing and drying.

The Egyptian Collar Effect
Lay your dry t-shirt on a flat surface and, using painter’s tape, mark off a point about mid-chest. You want the t-shirt to be dry, because you want to create clean dots & dashes, as opposed to blots and splashes. The painter’s tape marks off the limit for your collar. Squeeze your desired colors into dots and dashes, and make sure to have enough space between them for your colors to spread. Once you are done with your dyeing, and you are happy with the outcome, take a spray bottle and spray clean water on the colored areas until the areas get damp. You want to do this after you do the dying so that the colors seep deeply into the fabric. Spray only on the colored parts. Allow the colors to set for 8 hours, then rinse and wash.


